Follow along with this step-by-step tutorial to create a beautiful crochet angel ornament that will be a treasured keepsake for years to come.
Skills Required: Advanced Beginner. You will use the basic single, double, and half double crochet stitches for this project. However, it is a bit more advanced since you will need to crochet around a wooden ring.
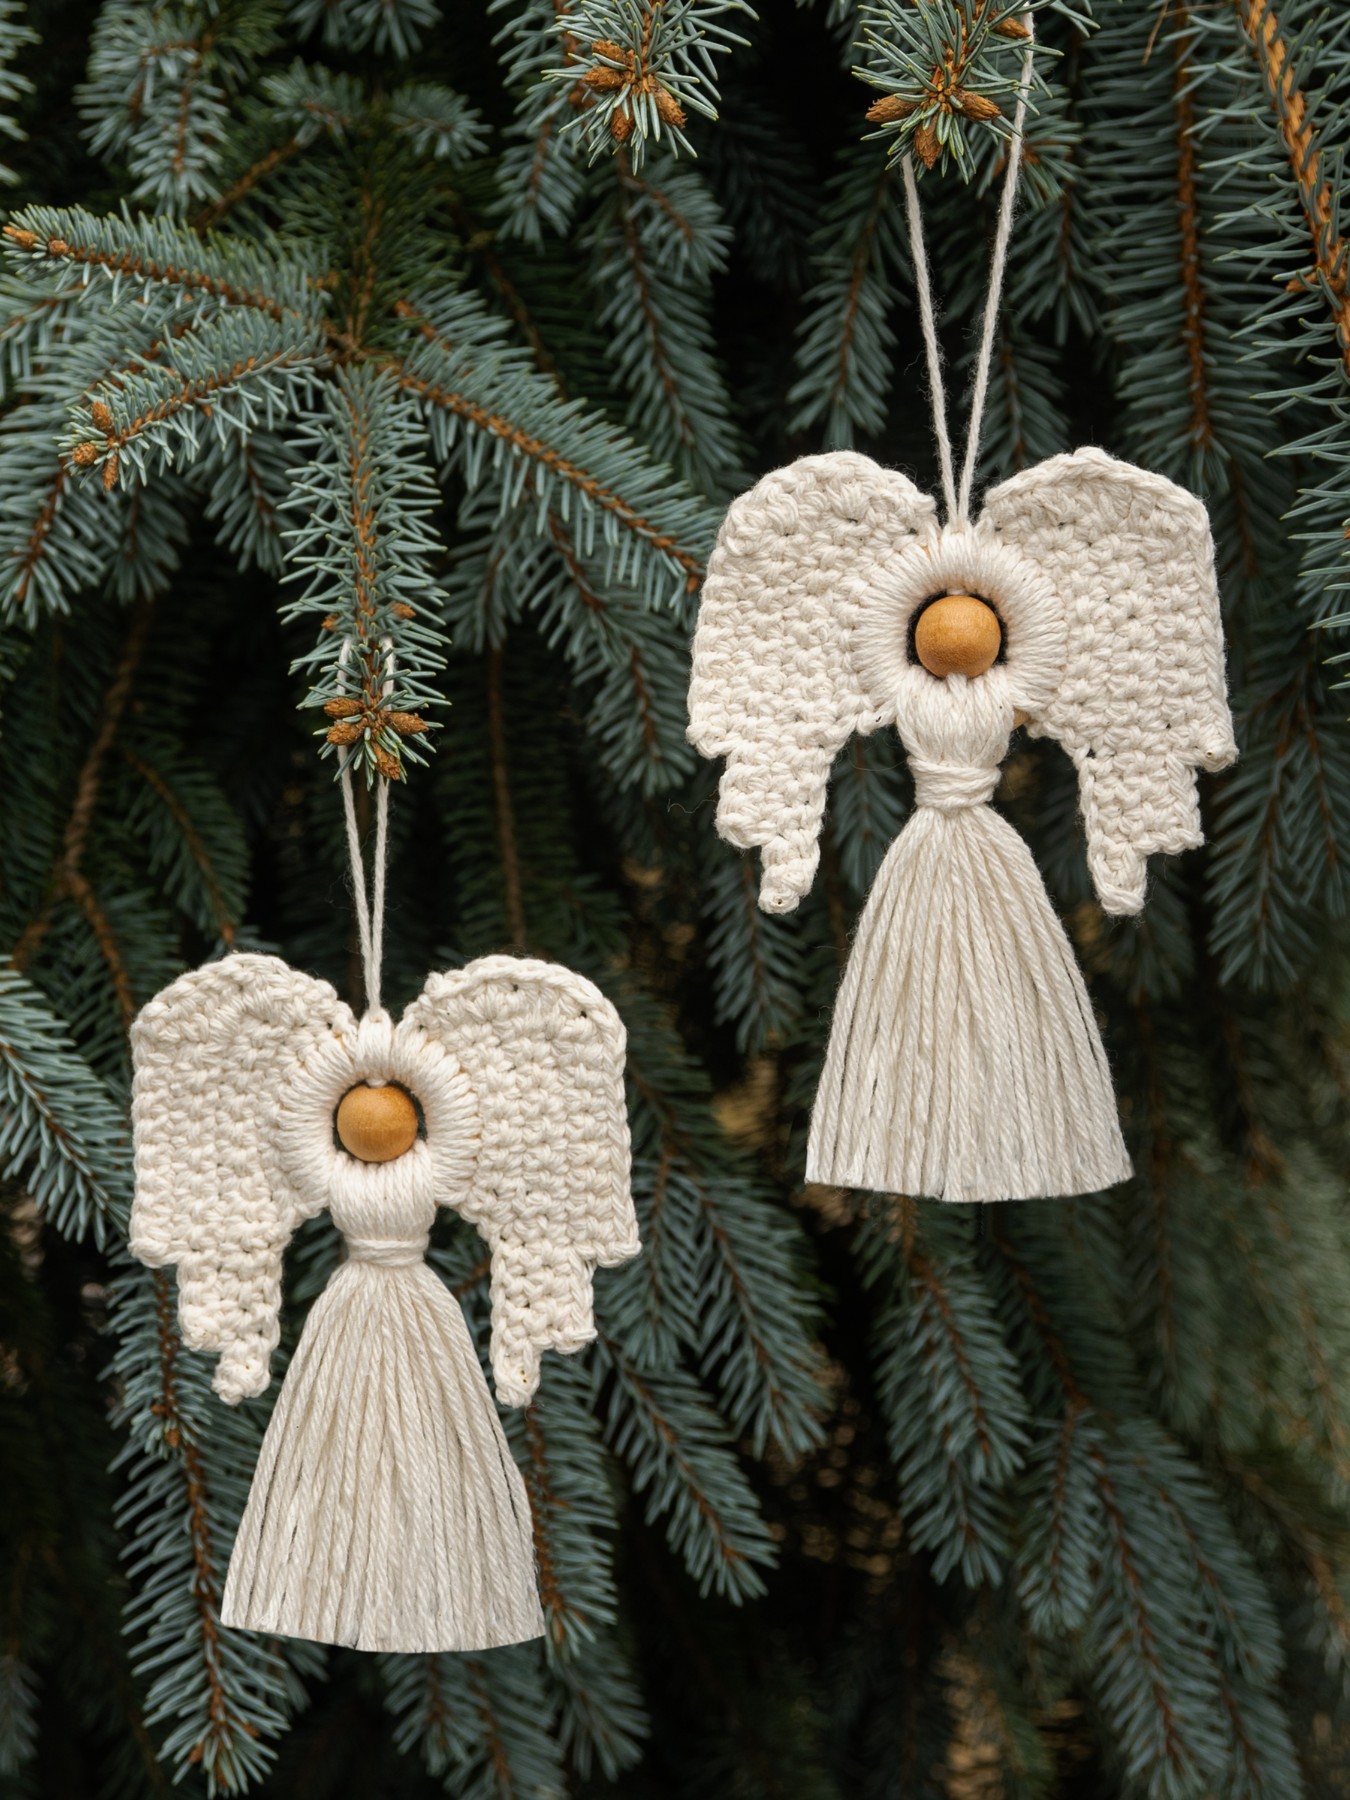
Homemade ornaments make each Christmas tree unique. I know I enjoy taking out ornaments every year and thinking about what I was doing the year I made it. I have some great ones from when I was little like a cookie cutter ornament and even an Oscar the Grouch one where his head is popped out of a film container (remember those?)!
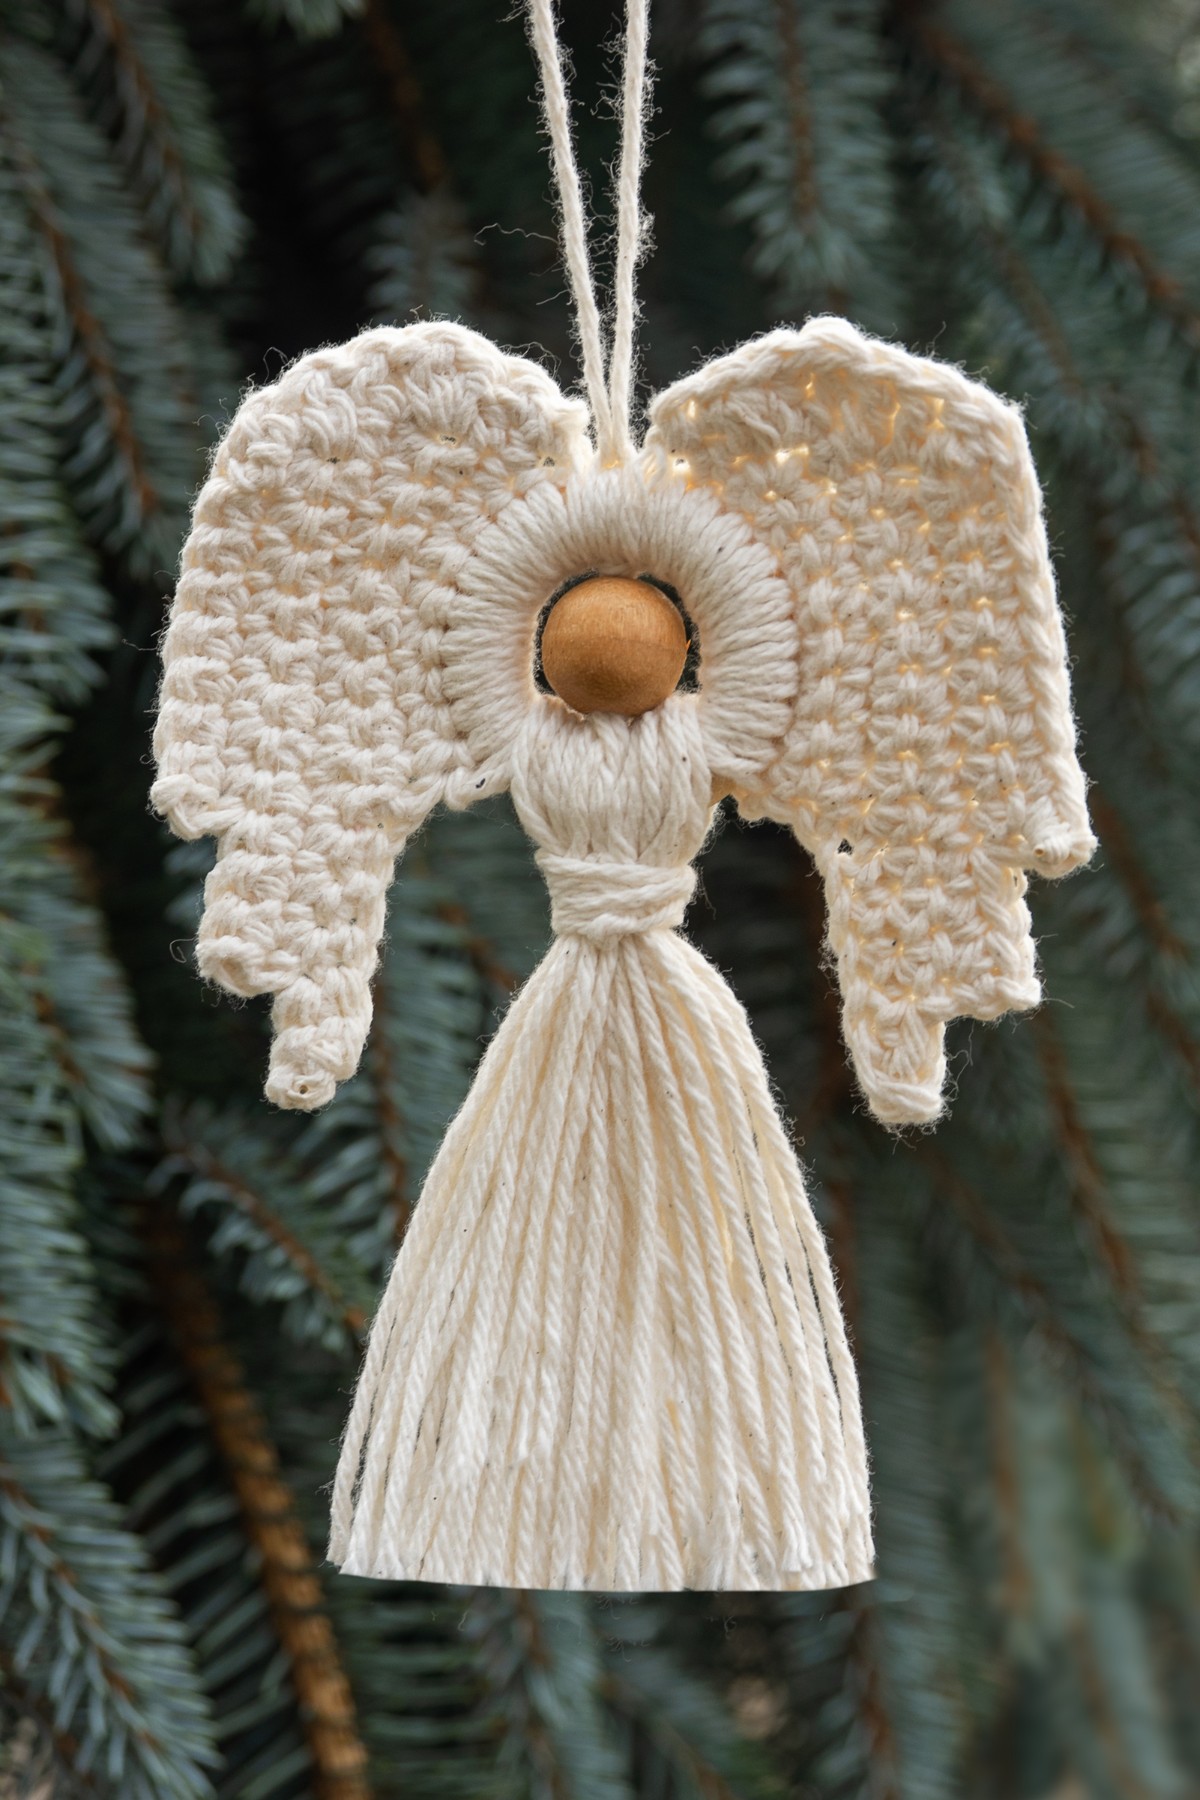
This year I’m making some crochet ornaments and thought I would share my angel ornament with you. Have you decorated your tree yet? Why not add some handmade joy to your Christmas tree this year with a crochet angel ornament? Once finished, it looks the same whether you hang it showing the front or the back!
Note: At the bottom of this post, you’ll find a printable version of the free crochet pattern. However, I think you’ll want to read through this post first so you get some important tips and photos.
Crochet angel ornament supplies
First things first, let’s gather our supplies!
Materials:
- Wood Ring – 1¾ inch
- Wood Bead – 16 mm
- 12 grams (~ 20 yards) 100% Cotton Worsted Weight Yarn – I used Lily Sugar ‘n Cream in Ecru*
- 1 tsp Mod Podge (optional)
- 1 tsp water (optional)
*Note: using cotton yarn is best if you want to stiffen the wings or block them to keep them from curling up.
Tools:
- Crochet Hook – G/7 (4.5 mm)
- Scissors
- Tapestry Needle
- Blocking foam or towel (optional)
- Rust-resistant T-pins (optional)
Abbreviations Used: (US notation)
- ch – chain
- sl st – slip stitch
- sc – single crochet
- hdc – half double crochet
- dc – double crochet
- st – stitch (es)
How to crochet an angel ornament
Okay, let’s begin! Keep in mind, gauge is NOT important for this project. Just stay consistent with your stitches throughout the pattern.
Crochet wing on wooden ring:
For this ornament, the wings are crocheted directly to the wood ring. Start with a slip knot on your hook and hold the ring like this (click on images to see them larger):
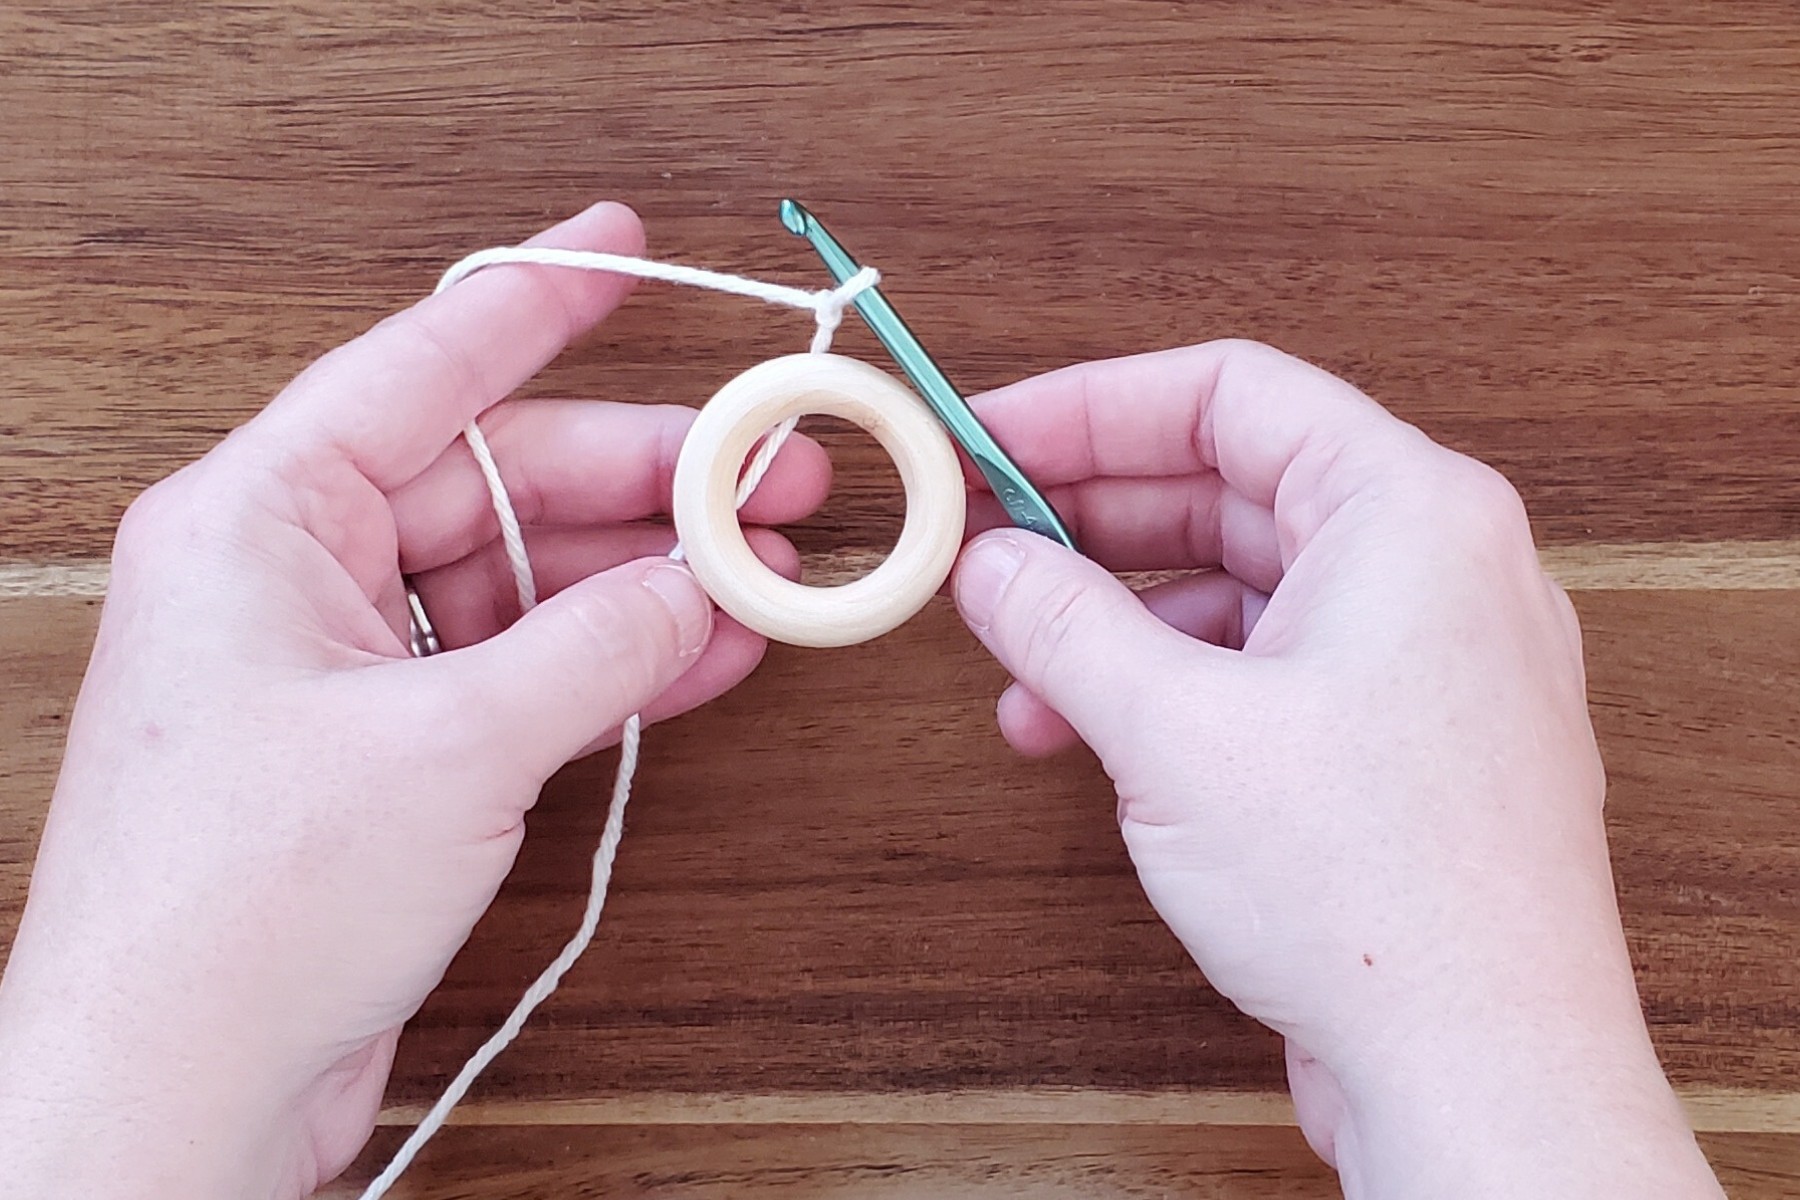


Row 1: 10 sc around wood ring making sure to go over the yarn tail holding it in place, ch 1, turn
Photo below shows part way through row 1. If you are unsure how to crochet on a ring, you can watch this video.
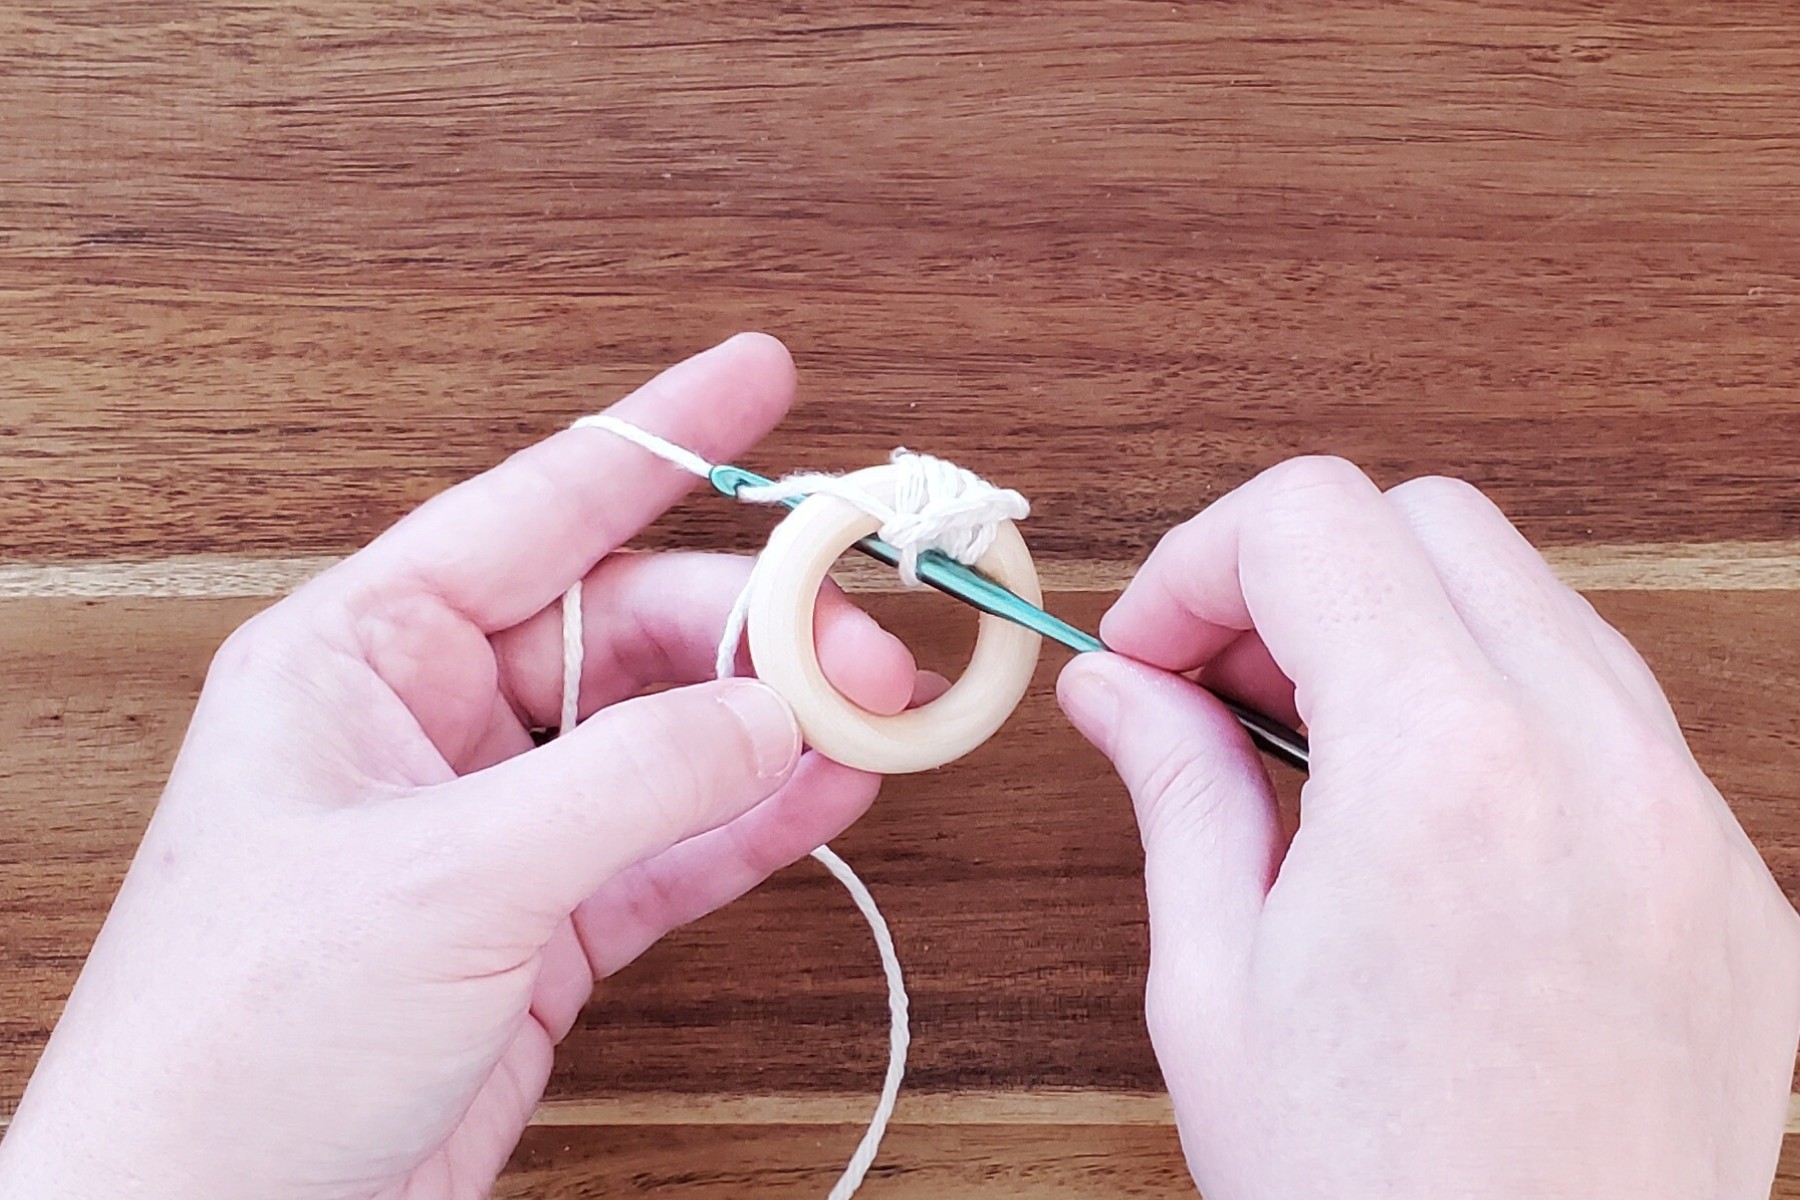
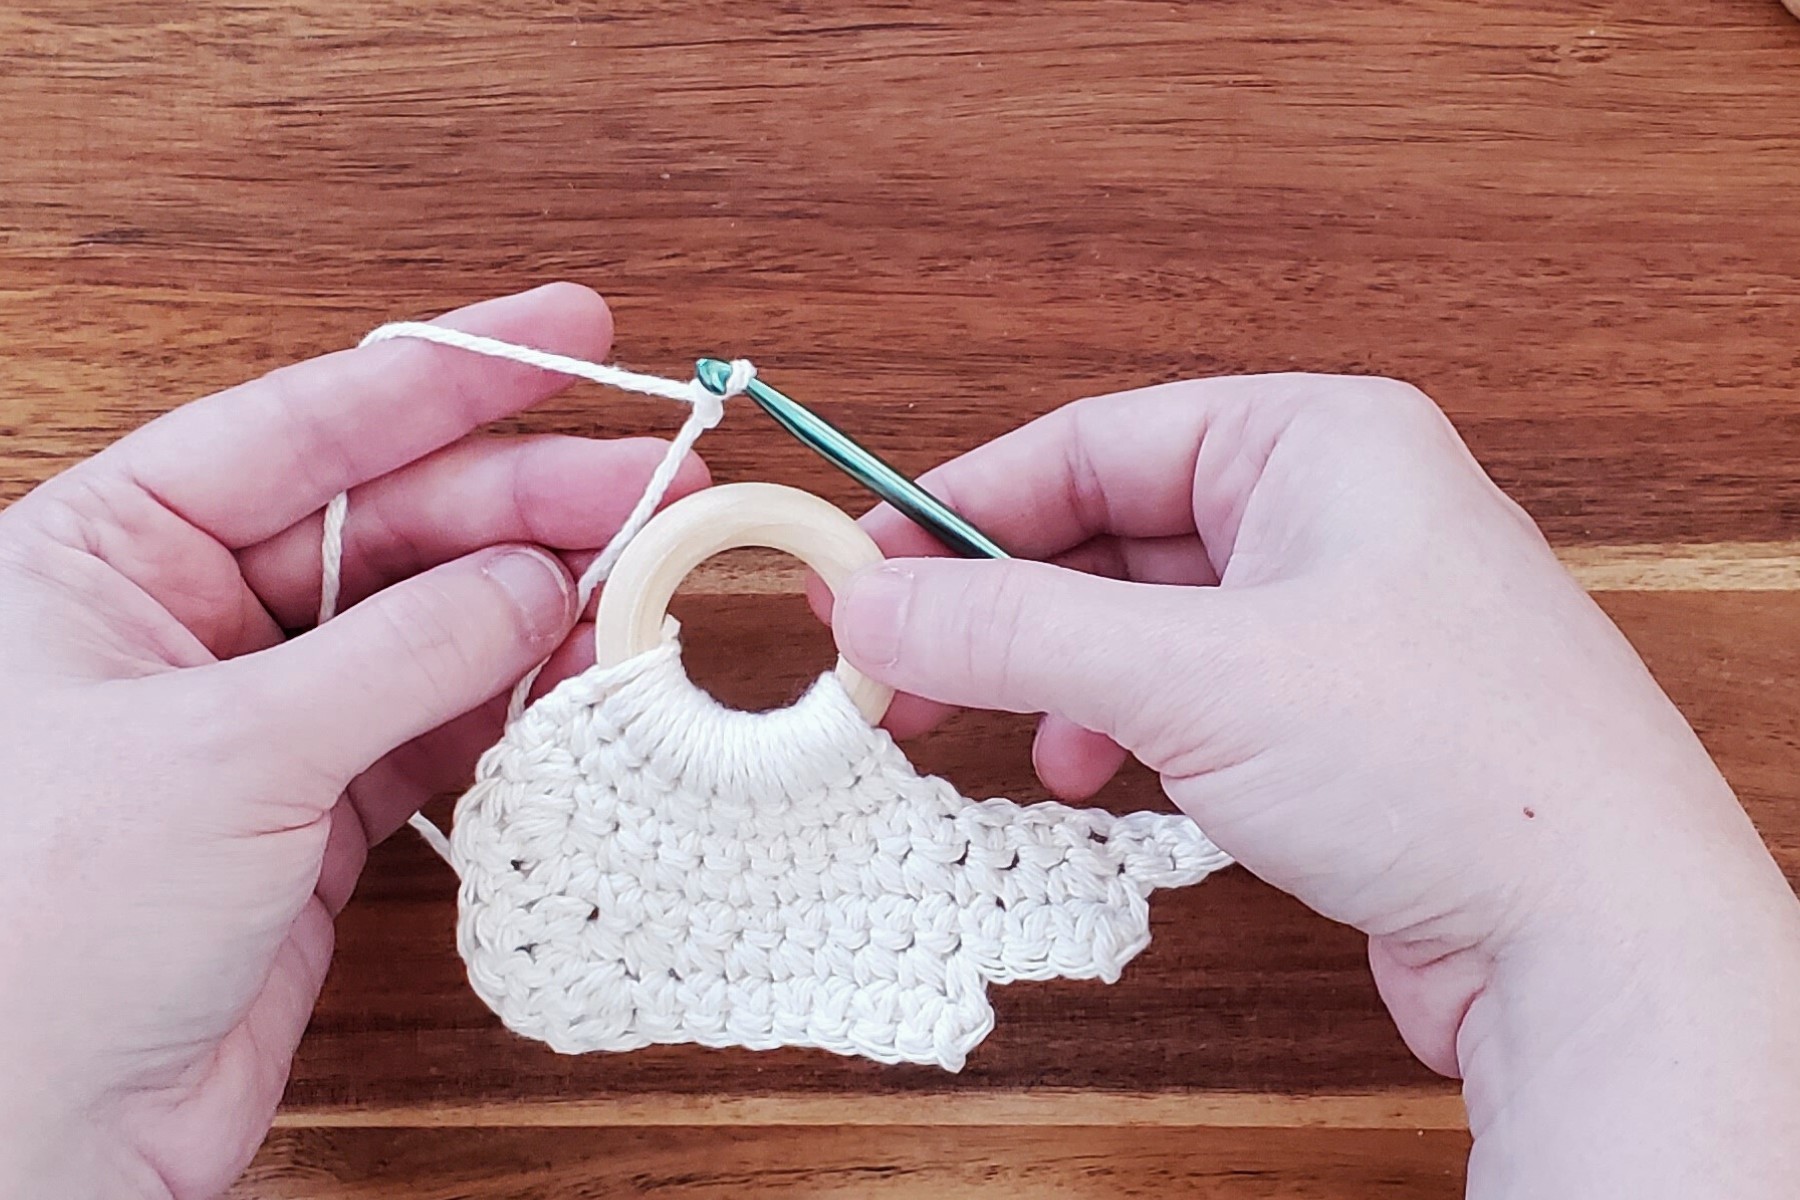
Row 2: 10 sc, ch 7, turn
Your work should look like the photo below.
Row 3: sc in second chain from hook (see purple arrow above) and in next 14 st leaving last st empty, ch 1, turn
Row 4: 13 sc, ch1, turn
Row 5: 12 sc, leave last stitch empty, ch1, turn
Row 6: 9 sc, ch1, turn
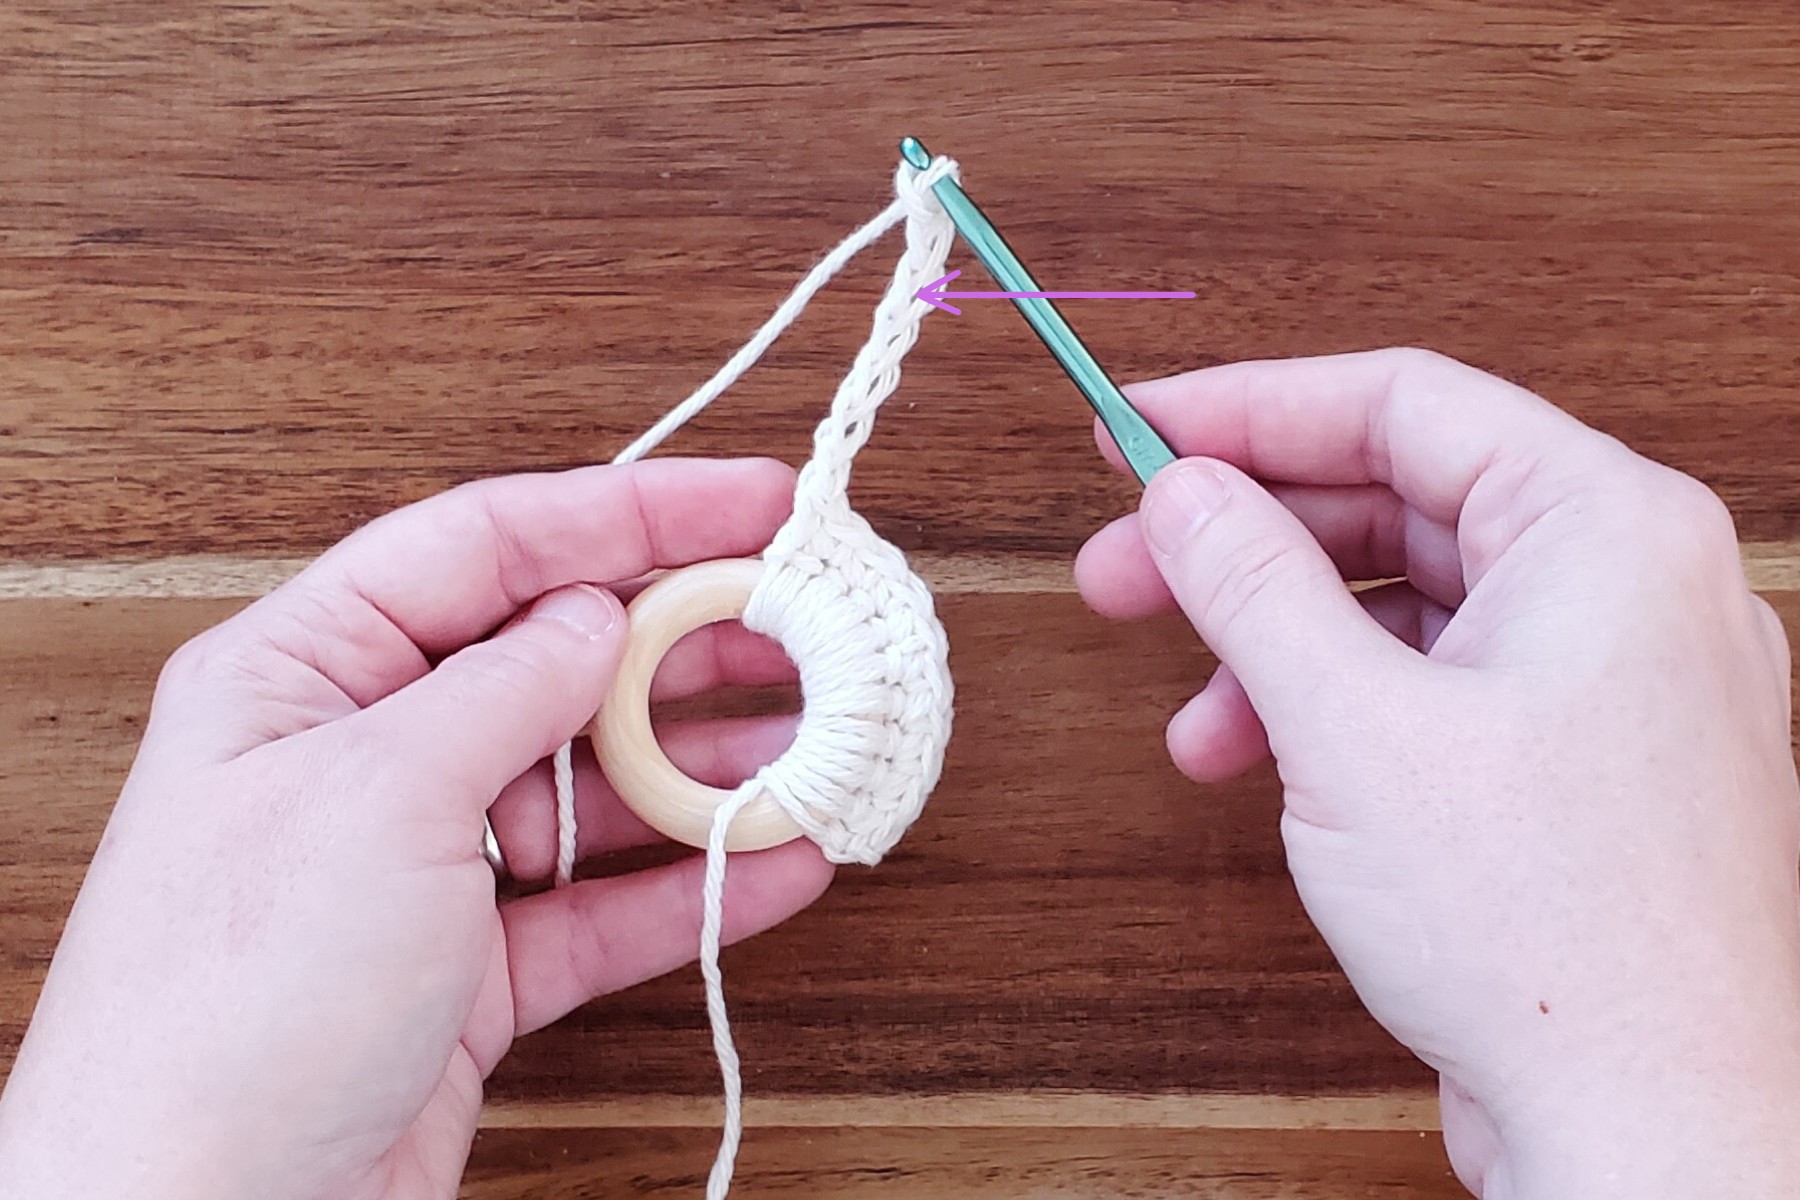
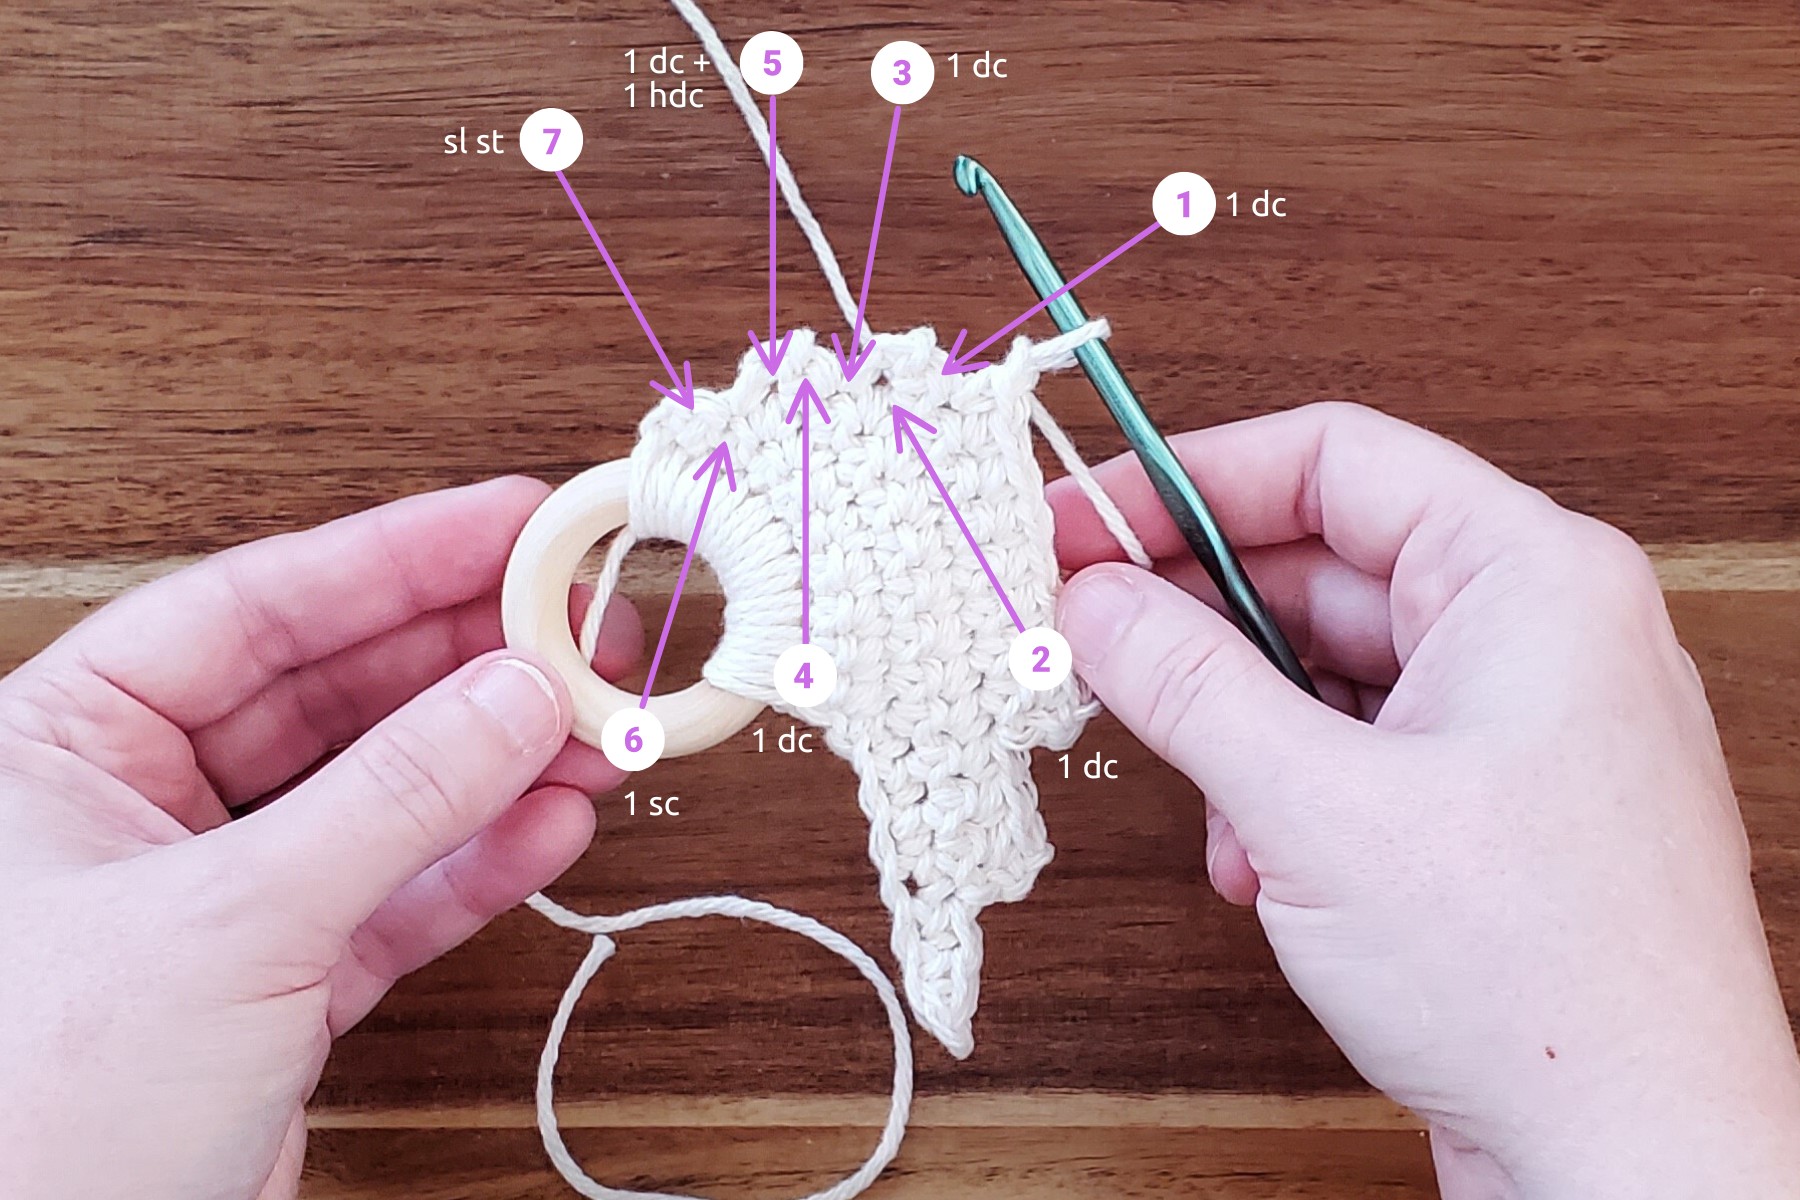
Row 7: 8 sc, Starting in last stitch and working around ends of rows, 5 dc, 1 hdc in same stitch, 1 sc, join with sl st to first row. Finish off.
Photo below shows the placement of the last stitches.
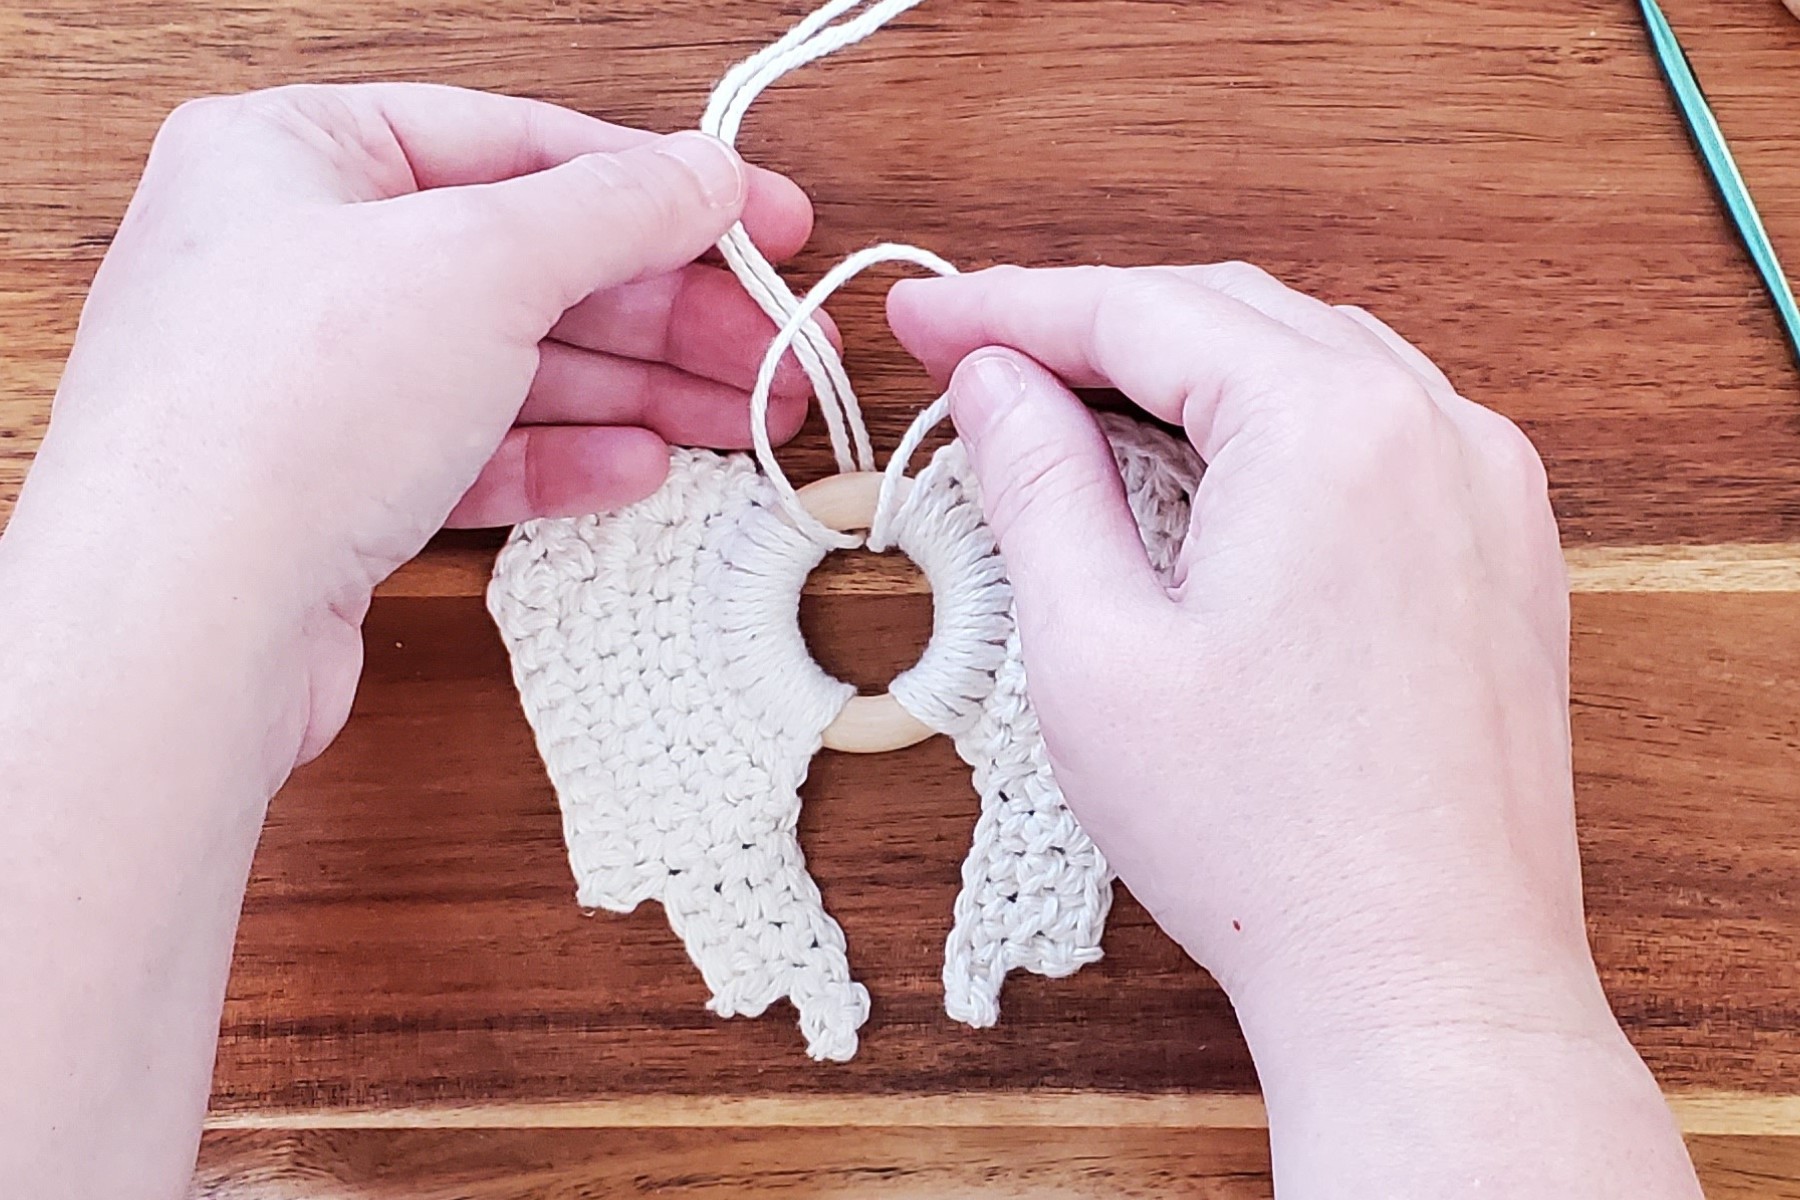
Pull on starting yarn tail and trim it. Turn wood ring over and repeat steps to complete 2nd wing.
Note: At this point, you may notice that your wings are curling up. Don’t worry—we will take care of that in the finishing of the ornament.
Add head to angel:
Cut 2′ (24″) piece of yarn.
Attach yarn to wood ring between tops of wings using a lark’s head knot.
Photo below shows beginning of knot. Complete it by pulling the two ends through the loop.
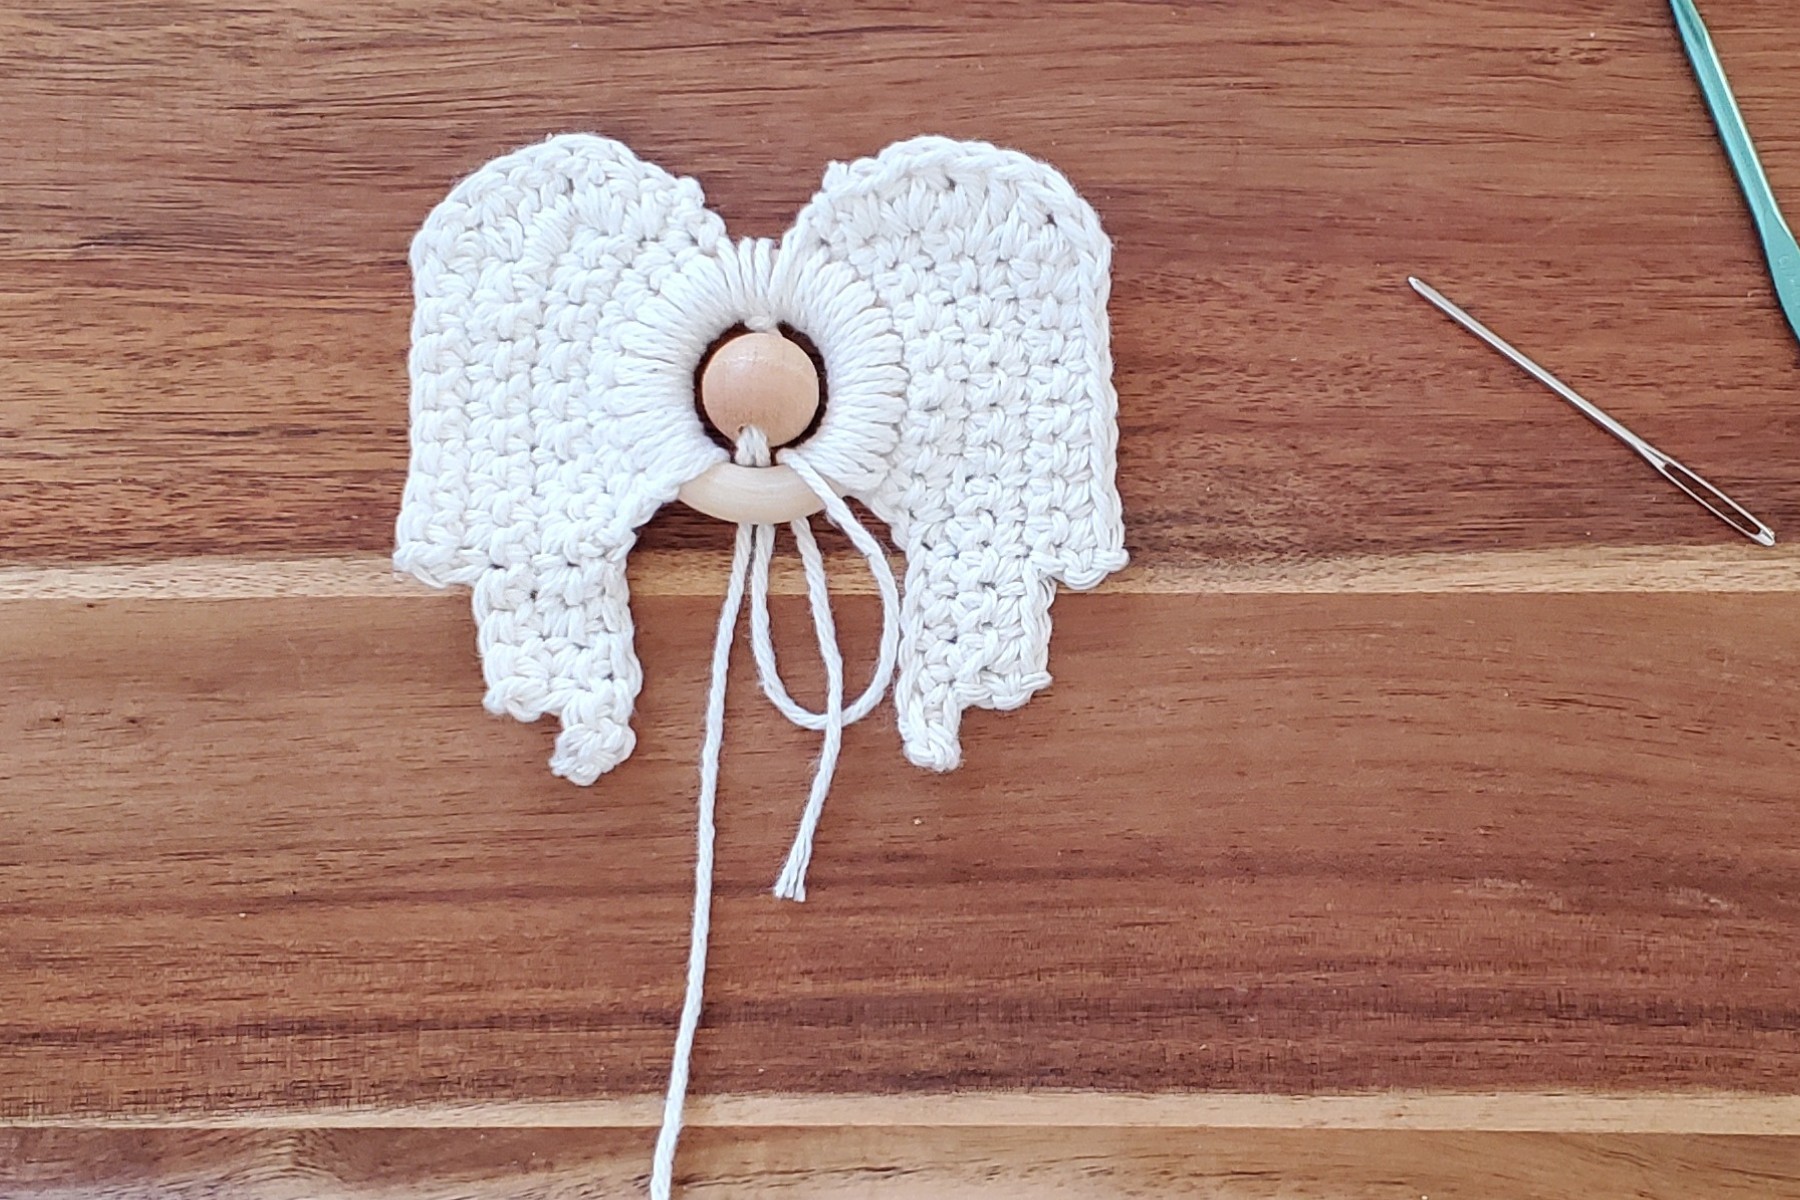
Thread tapestry needle with both ends of yarn and feed the needle through the wood bead.
Wrap each end of yarn around wood ring (as shown below) and pull tight.
Add body to angel ornament:
Cut 24 10″ pieces of yarn.
Gather together half of the pieces and feed through wood ring on one side of head. Pull both ends down until they are even.
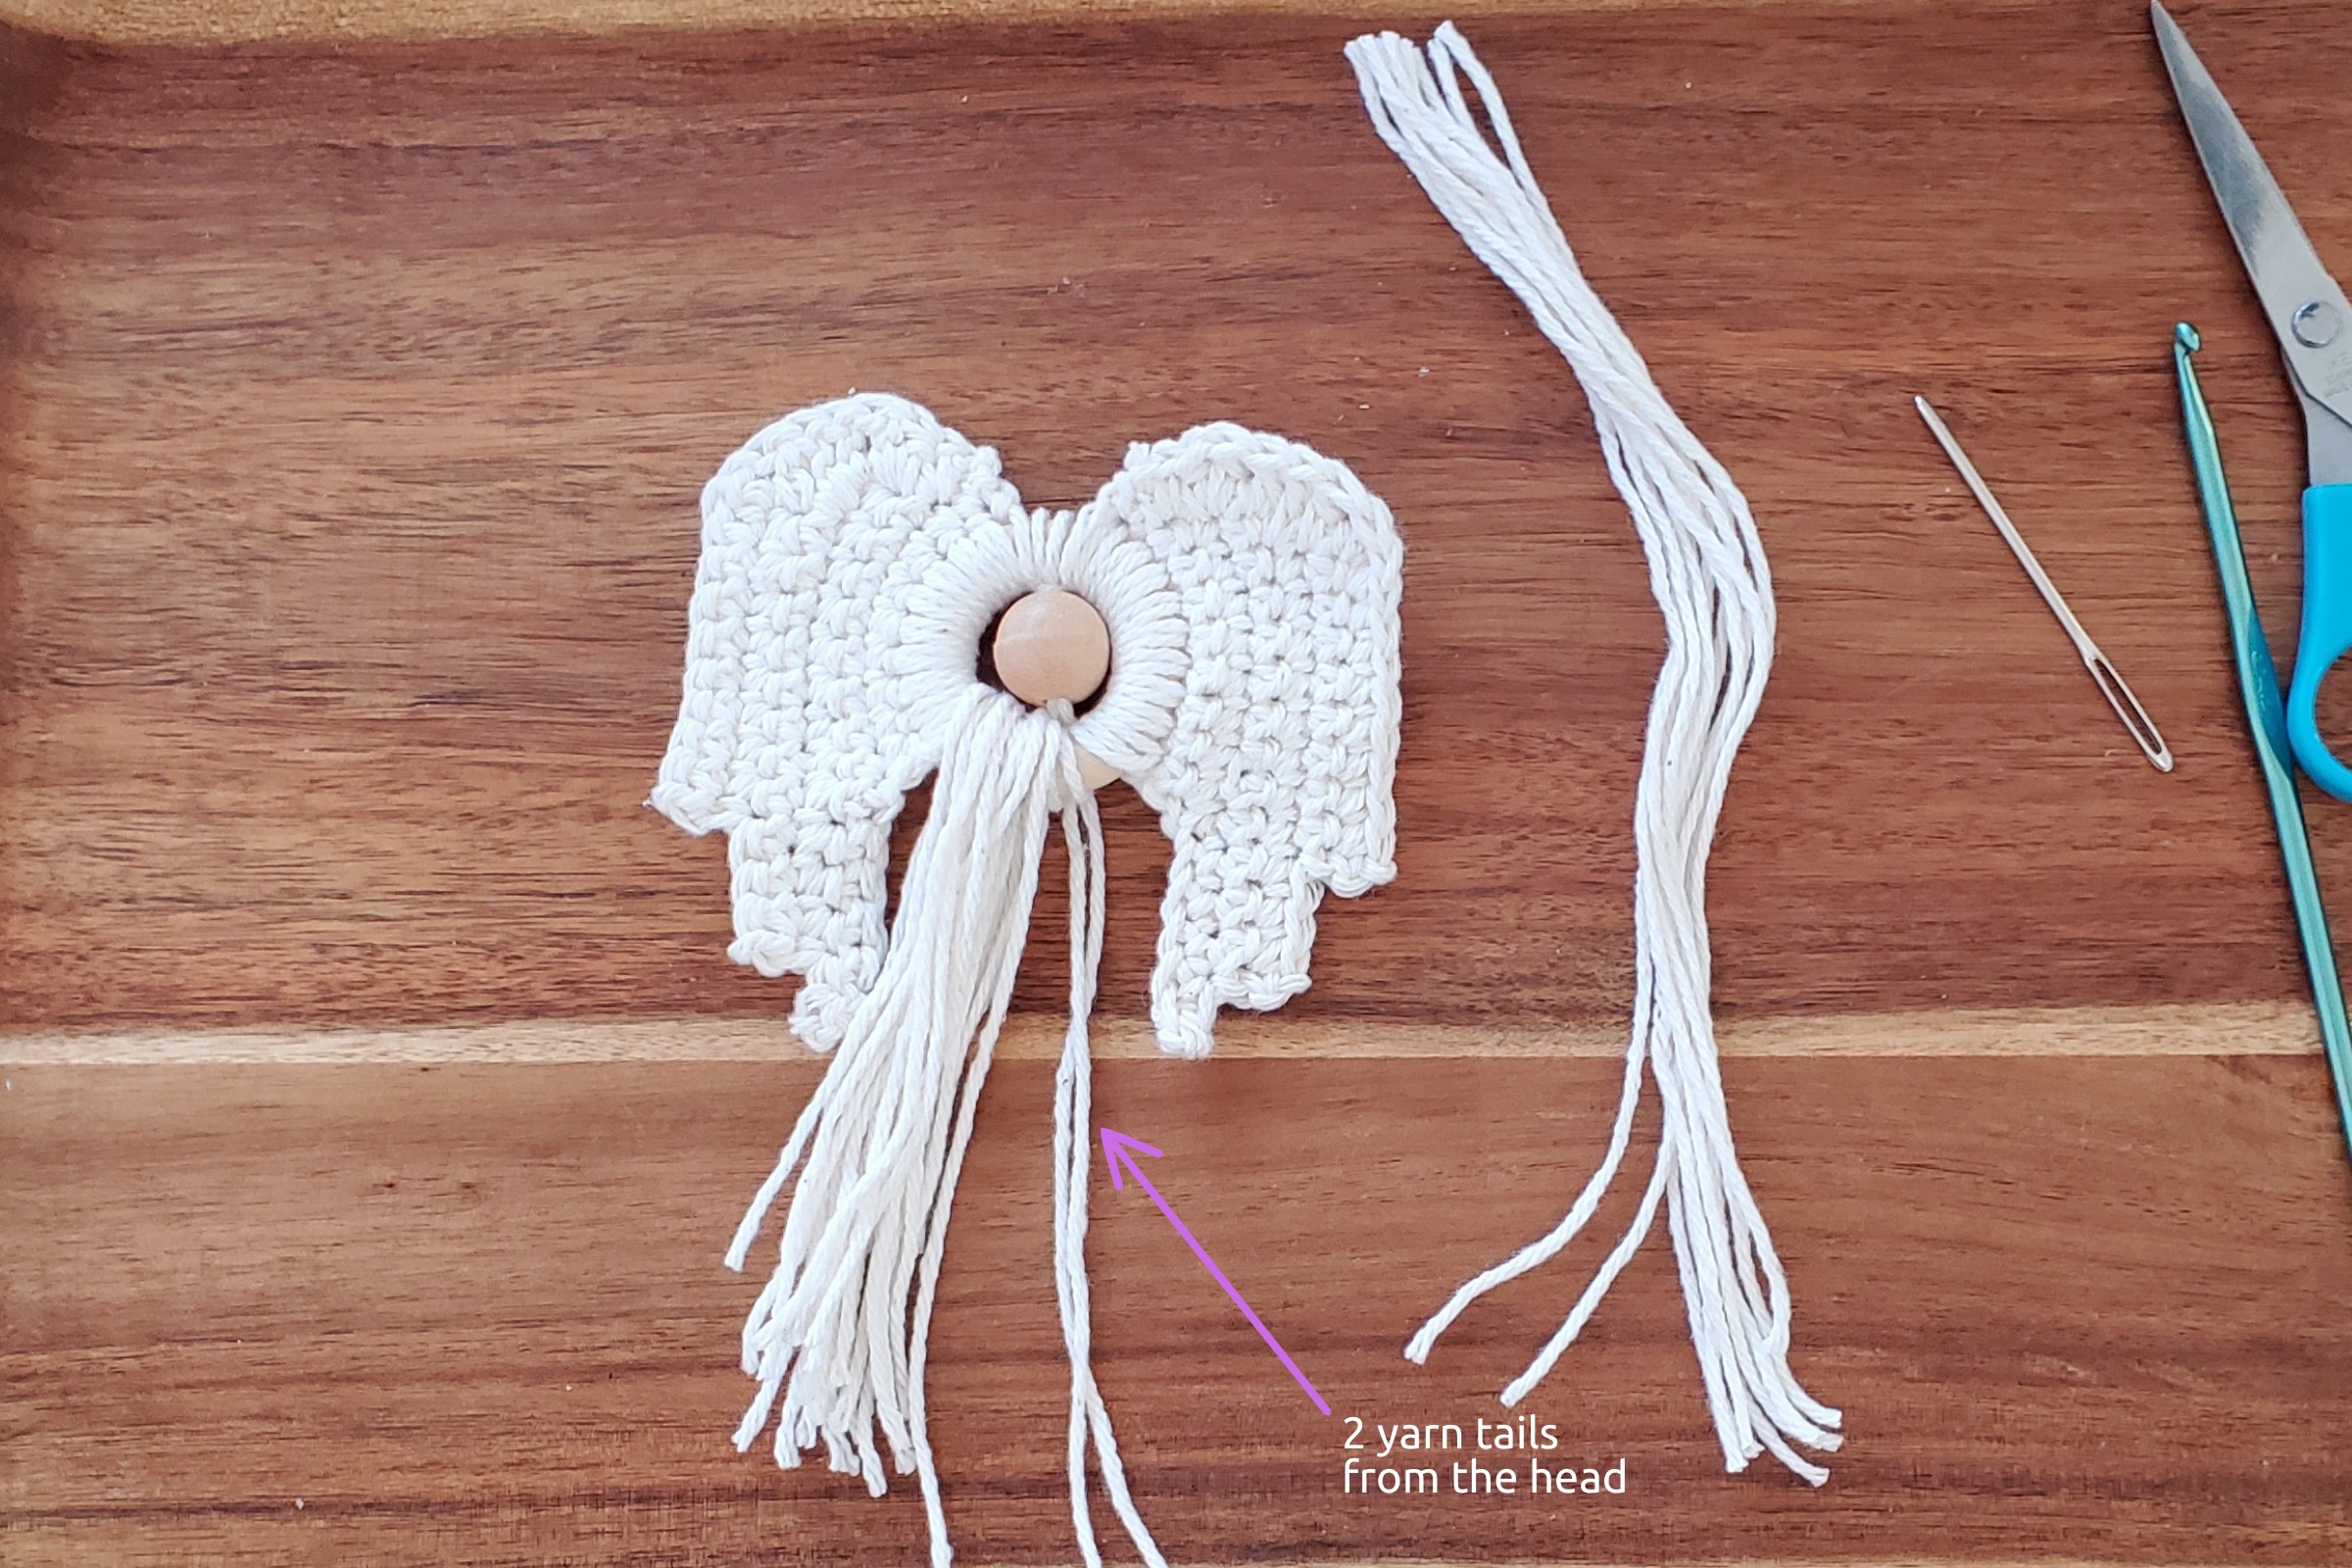
Gather together other 12 pieces of yarn and add them to right side of head. Pull down until even.
Group all of the yarn together (except for ends that go with the head). At this point, you may wish your angel to be thinner or fatter, just remove or add in pieces of yarn until it is the shape you want.
In opposite directions, wrap each head yarn around the bunch numerous times to create a waist and tie the ends together.
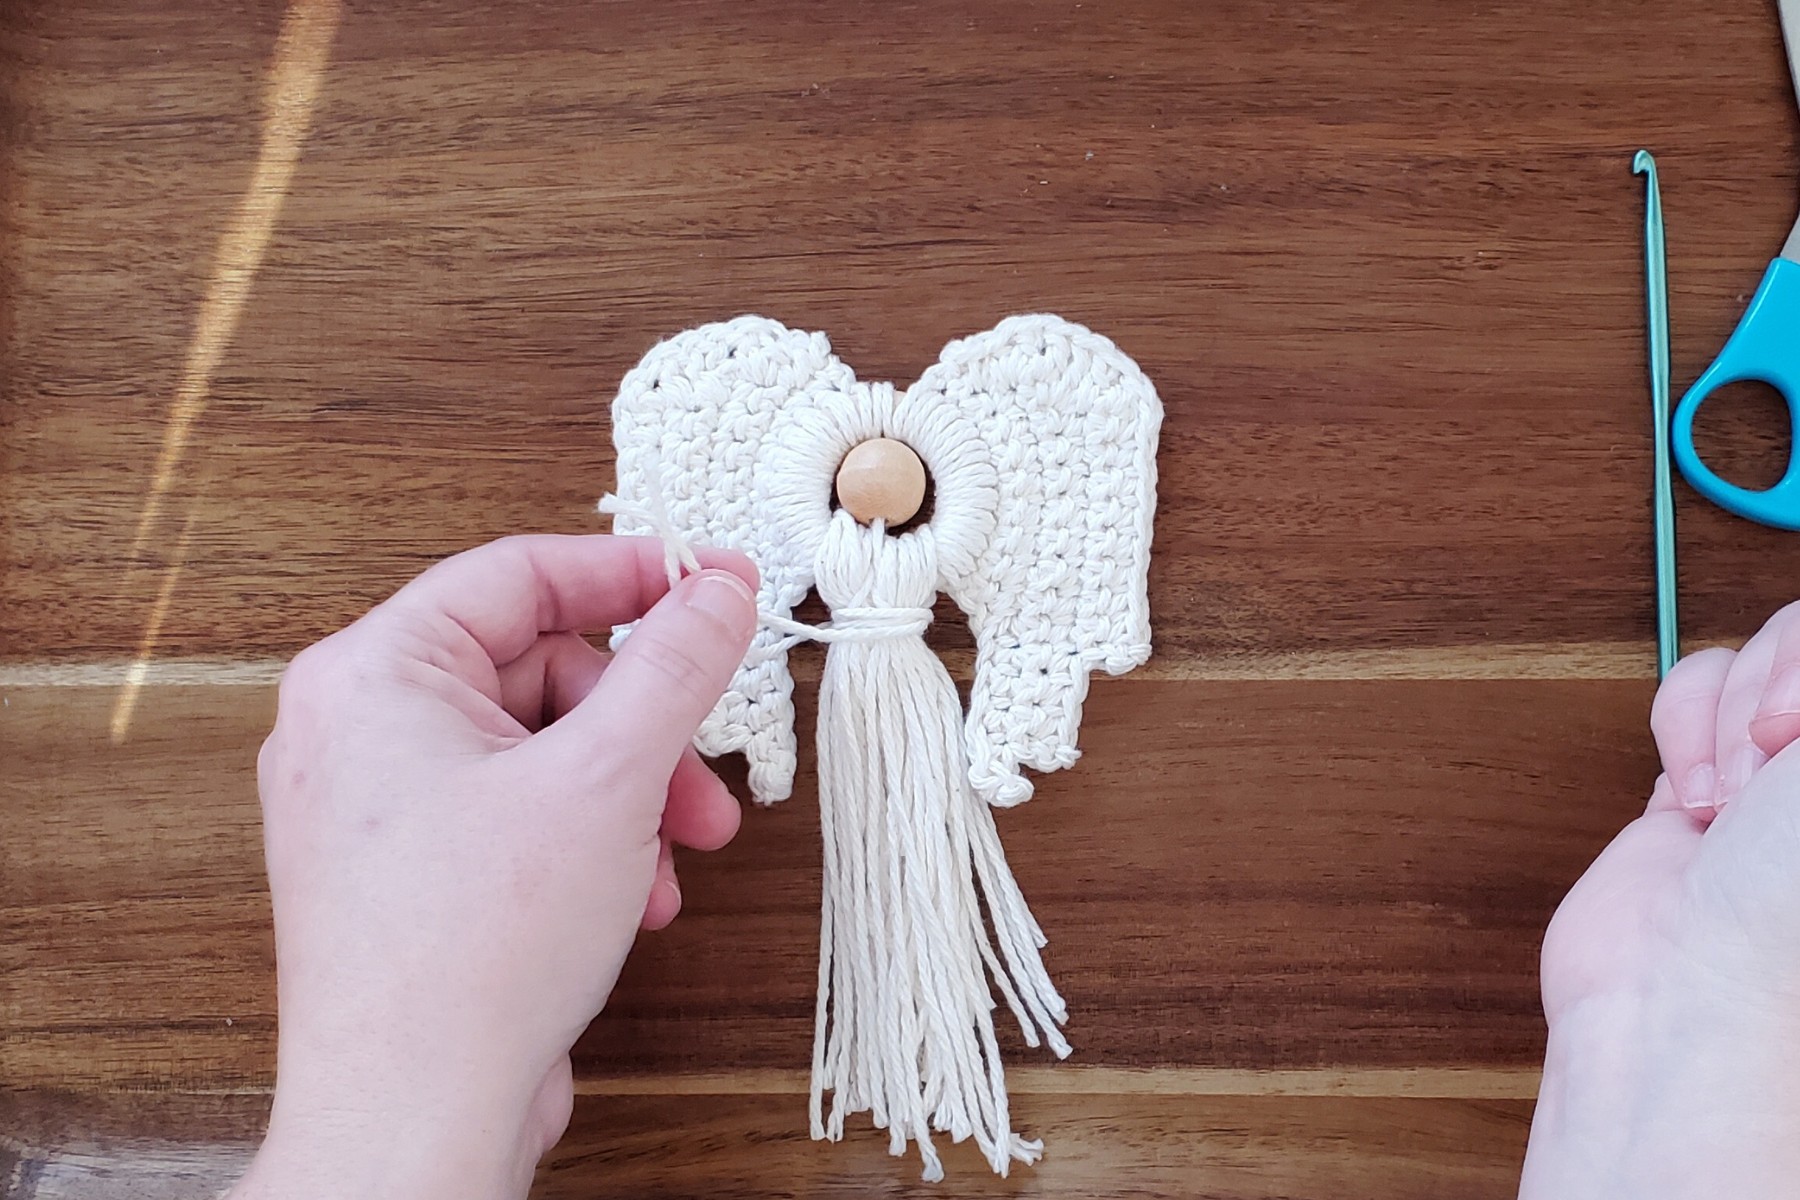
Thread these two ends through a tapestry needle and insert under the wrapped waist. Trim ends.
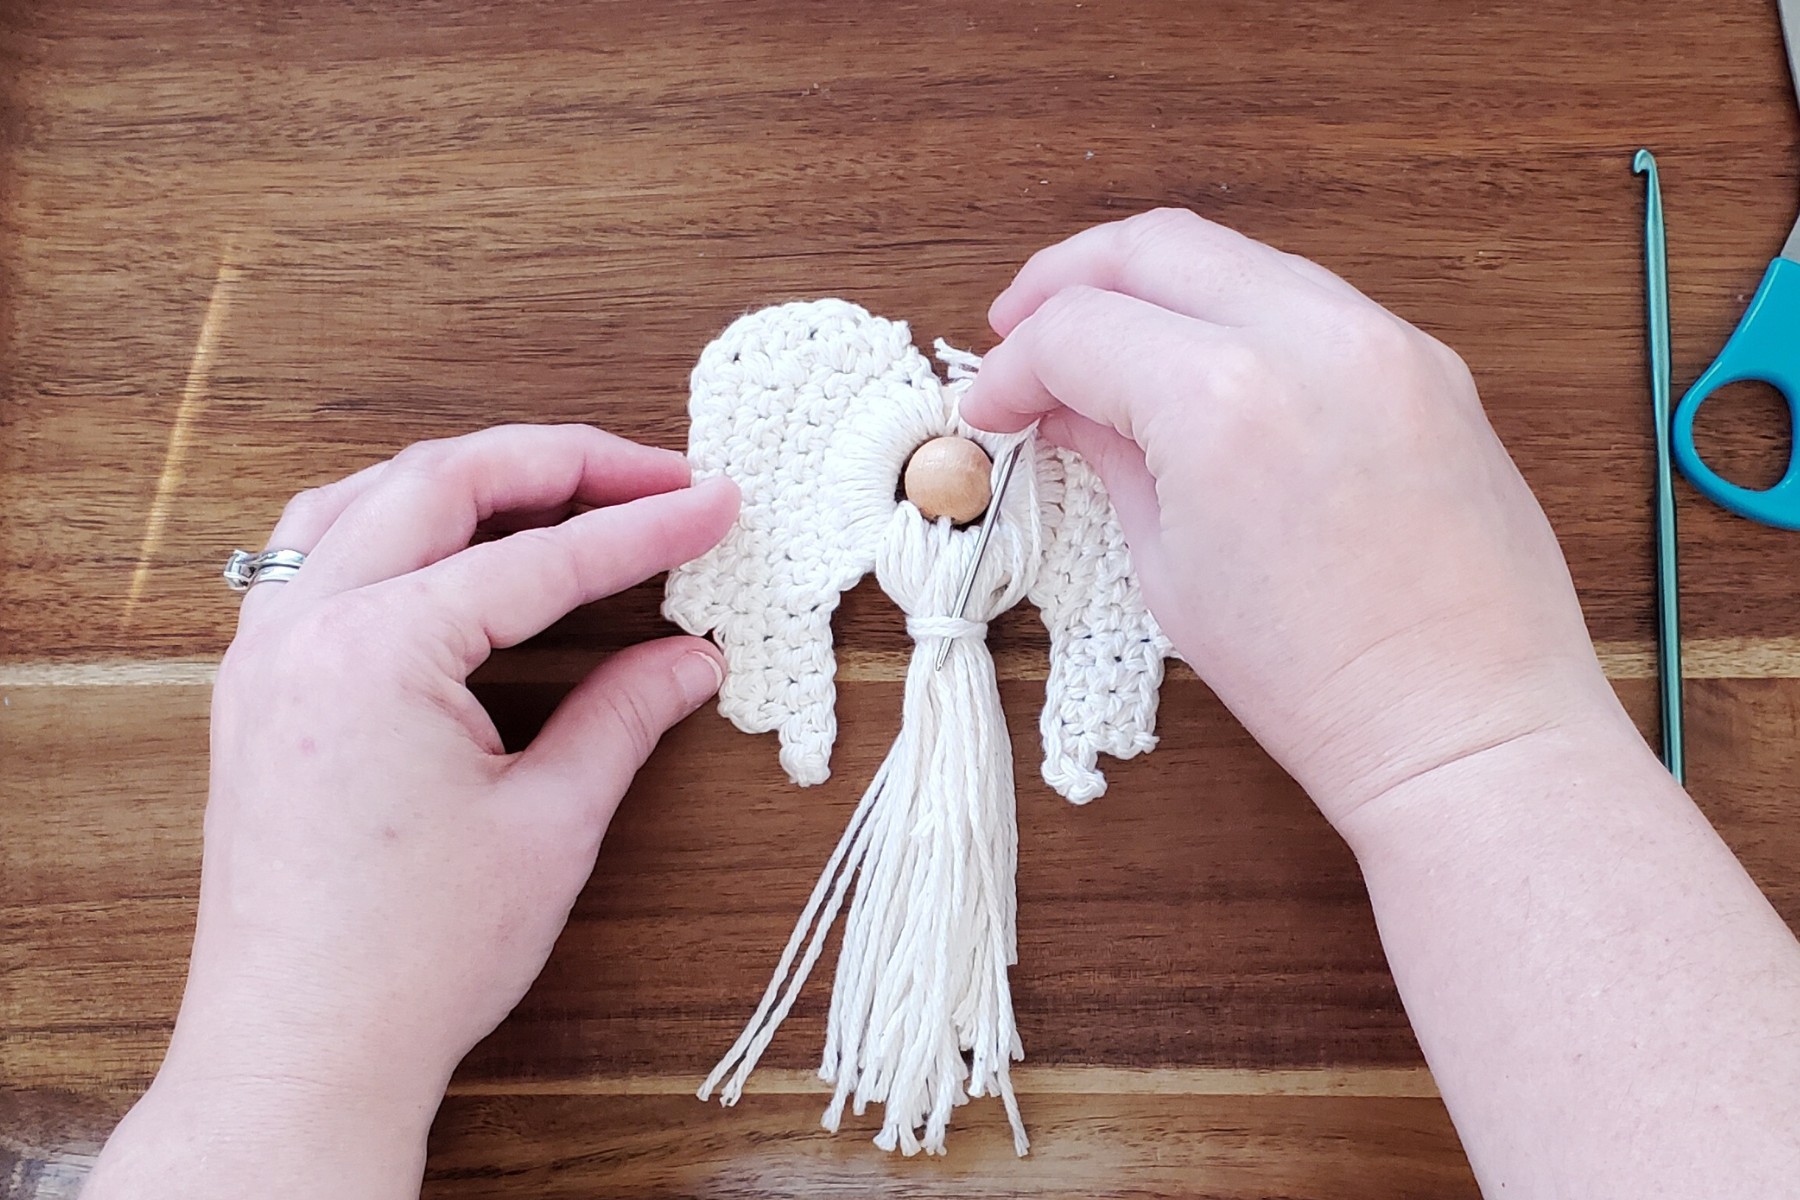
Adjust wings so that wood ring is completely covered.
Cut 1 10″ piece of yarn and attach to top of ring using a lark’s head knot. Tie two ends together to form loop for hanging the ornament.
Hang ornament and trim body yarn so it is even.
Finishing your crochet angel ornament (optional)
You can leave the ornament as-is, block the wings using T-pins and foam, or stiffen the wings. If the wings aren’t staying flat, you can block them, but stiffening them will last longer.
To stiffen the wings mix 1 part Mod Podge and 1 part water.
Pin ornament down with T-pins so it is the shape you would like. Use your finger or a paint brush to add Mod Podge mixture to wings. It is important to use rust-resistant pins; otherwise the liquid could cause rust to get on your ornament. You don’t want to ruin your masterpiece before it even makes it to the tree!
Let it dry for at least 1 hour and then turn over to repeat on the other side.
Enjoy your new handmade crochet angel ornament. It will look great on your tree, as a gift topper, or as part of a gift for anyone on your list!
Crochet Angel Ornament

Follow along with this step-by-step tutorial to create a beautiful crochet angel ornament that will be a treasured keepsake for years to come.
Materials
- Wood Ring - 1¾ inch
- Wood Bead - 16 mm
- 12 grams (~ 20 yards) 100% Cotton Worsted Weight Yarn - I used Lily Sugar 'n Cream in Ecru
- 1 tsp Mod Podge (optional)
- 1 tsp water (optional)
Tools
- Crochet Hook - G/7 (4.5 mm)
- Scissors
- Tapestry Needle
- Blocking foam or towel (optional)
- Rust-resistant T-pins (optional)
Instructions
Wing (make 2)
Row 1: 10 sc around wood ring, ch 1, turn
Row 2: 10 sc, ch 7, turn
Row 3: sc in second chain from hook and in next 14 st leaving last st empty, ch 1, turn
Row 4: 13 sc, ch1, turn
Row 5: 12 sc, leave last stitch empty, ch1, turn
Row 6: 9 sc, ch1, turn
Row 7: 8 sc, Starting in last stitch and working around ends of rows, 5 dc, 1 hdc in same stitch, 1 sc, join with sl st to first row. Finish off.
Turn wood ring over and repeat steps to complete 2nd wing.
Head
- Cut 2' piece of yarn.
- Attach yarn to wood ring between tops of wings using a lark's head knot.
- Thread tapestry needle with both ends of yarn and feed the needle through the wood bead.
- Wrap each end of yarn around wood ring and pull tight.
Body
- Cut 12 10" pieces of yarn.
- Gather together and feed through wood ring on one side of head. Pull both ends down until they are even.
- Cut 12 more 10" piece of yarn and add them to other side of head. Pull down until even.
- Group all of the yarn together (except for ends that go with the head). Wrap each head yarn around the bunch numerous times to create a waist and tie the ends together. Thread these two ends through a tapestry needle and insert under the wrapped waist. Trim ends.
- Adjust wings so that wood ring is completely covered.
- Cut 1 10" piece of yarn and attach to top of ring using a lark's head knot. Tie two ends together to form loop for hanging the ornament.
- Hang ornament and trim body yarn so it is even.
Finishing
- You can leave the ornament as-is, block the wings using T-pins and foam, or stiffen the wings.
- To stiffen the wings mix 1 part Mod Podge and 1 part water. Pin ornament down with T-pins so it is the shape you would like. Use your finger or a paint brush to add Mod Podge mixture to wings.
- Let it dry for at least 1 hour and then turn over to repeat on the other side.
Notes
Abbreviations Used:
- ch - chain
- sl st - slip stitch
- sc - single crochet
- hdc - half double crochet
- dc - double crochet
- st - stitch (es)
If you have any questions, make sure to read the blog post above for additional tips and photos.
Recommended Products
As an Amazon Associate and member of other affiliate programs, I earn from qualifying purchases.


Did you enjoy crocheting this angel ornament? Then you should check out these other fun yarn projects:
- Amigurumi Patterns Too Cute Not to Crochet
- Free Fall Knitting Patterns Perfect for the Season
- Yarn Crafts That Require No Skill to Make!
- Yarn Wrapped Christmas Tree Decor
- Make a Pom Pom Garland in Three Easy Steps!
The post Crochet Angel Ornament (Free Christmas Pattern) appeared first on DIY Candy.


